Configuring the FaxPress Enterprise Xerox Interface
The FaxPress Enterprise Xerox Interface is configured using Xerox Interface Configuration Wizard. Before configuring the Xerox Interface, make sure you’ve reviewed the Xerox Interface Setup Procedures and that you’ve created a Fax Repository folder for each Xerox system on your network, as described in Creating the Fax Repository Folder.
When you’ve finished configuring the Xerox Interface, be sure to send test faxes from the Xerox system, and send test faxes to FaxPress Enterprise users from a remote location, to confirm the FaxPress Enterprise Xerox Interface is configured properly.
Accessing the FaxPress Enterprise Xerox Interface Configuration Utility
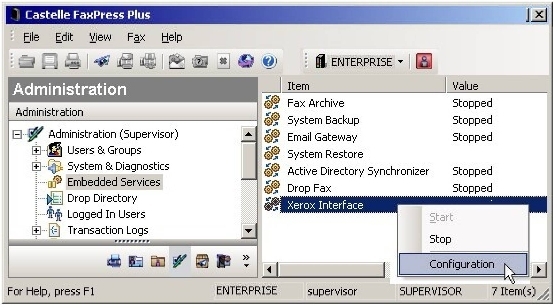
The FaxPress Enterprise’s Xerox Interface is one of the FaxPress Enterprise’s Embedded Services. To access the FaxPress Enterprise Xerox Interface Configuration Wizard, follow these steps:
| 1. | Log into FaxPress Plus as Administrator or as a Administrator-privileged user. |
| 2. | Select the Administration folder. (This folder is only available if you’re logged in with Administrator privileges.) |
| 3. | Select the Embedded Services folder. |
| 4. | Right-click on the Xerox Interface and select Configuration. |
Using the Xerox Interface Configuration Wizard
The Xerox Interface Configuration wizard provides the Xerox Interface’s configuration parameters, including fax repository and network protocol information, inbound and outbound fax settings, Xerox system/FaxPress Enterprise user mappings, as well as Email and Trace Tool settings.
The Repository window, the first screen in the Configuration wizard, allows you to add, remove and edit the fax repositories you created in Creating the Fax Repository Folder.
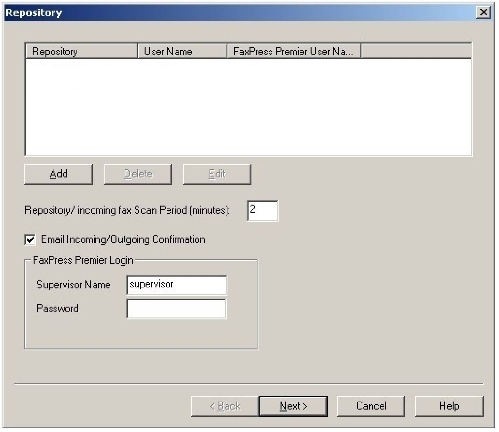
Repository Incoming fax scan period – specify the interval, in minutes, the Xerox Interface should wait between checking the fax repository for new fax outgoing fax jobs. If the Email Incoming/Outgoing Confirmation option is selected, the Xerox Interface will also check the FaxPress Enterprise for new incoming faxes according to the same scan period interval.
Email Incoming/Outgoing Confirmation – selecting this option configures the Xerox Interface to email outgoing fax success or failure notices to the FaxPress Enterprise user associated with the fax repository. Selecting this option also configures the Xerox Interface to email received fax notices to fax recipients.
In the FaxPress Enterprise Login section’s Administrator Name and Password fields, enter information for a Administrator-privileged FaxPress Enterprise user the Xerox Interface can use to log onto the FaxPress Enterprise and check for incoming faxes.
Use the Add button to add a new fax repository for the Xerox Interface to check for outbound faxes. In the Enter Repository Folder Data window, use the Browse button to select a fax repository folder. (For more information on repository folders, see Creating the Fax Repository Folder.)
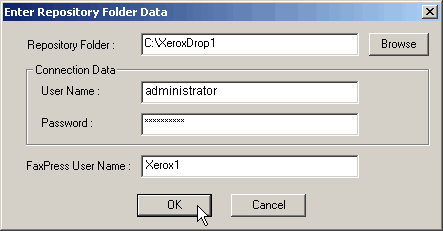
In the Connection Data section, enter the User Name and Password of an authenticated network user with full access rights to the repository workstation. The FaxPress Xerox Interface will use this account to connect to the fax repository folder. Administrator accounts are frequently used for this purpose.
The FaxPress Enterprise User Name will be used to send out the scanned fax jobs from the Xerox system if the sender’s mailbox ID is not available. A default FaxPress Enterprise user can be created for and associated specifically with the fax repository, such as Xerox1 in the example above. If the fax is sent using this repository default user, printed notification of fax success and failure will be sent to the repository default user, too. If there are several Xerox systems, each will have a unique fax repository (such as XeroxDrop2. XeroxDrop3, etc.) and each can have a default user for the fax repository (Xerox2, Xerox3, etc.). Each of these users must be mapped so they have the same FaxPress Enterprise User Name and Xerox User name.
To simplify printing of incoming faxes, you may want to route all faxes to a specific Xerox system. Do this by assigning an incoming fax line to the default repository user (Xerox1 in the example above). To make this line setting, start FaxPress Plus (Start>Programs>FaxPress>FaxPress Plus) then log in to the FaxPress Enterprise server and select the All Folders view. Expand the Neighborhood, right-click on the Enterprise server and choose Properties. Select the Line Settings tab, and in the Routing Type section, click the Assign Line to User radio button and select the default repository user (such as Xerox1) from the pull-down user menu.
Click Next to continue configuring the Xerox Interface.
The FaxPress Enterprise settings allow you to configure the Xerox Interface to send email notifications using either the Email Using SMTP option (for SMTP-based mail systems) or the Email Using MAPI option (required to use Outlook.)

If you select the Email Using SMTP option, click Next>.
If you select Email Using MAPI, Outlook must be installed on the FaxPress Enterprise server. Make sure you use the Outlook client installed on the FaxPress Enterprise to send at least one test email before using the Xerox Interface to send and receive faxes.
Also, further configure this window with the following information:
In the Domain, User, and Password fields, enter the name of the Exchange server’s network domain, and the name and password of the administrator user you assigned to the fax repository in the Connection Data’s User Name field In the Connection Data section, enter the User Name and Password of an authenticated network user with full access rights to the repository workstation. The FaxPress Xerox Interface will use this account to connect to the fax repository folder. Administrator accounts are frequently used for this purpose.. This account will become the Xerox Interface’s Exchange account, and must be the same as the one entered in the User Map in the following section.
In the FaxPress Enterprise Login section, enter the name of a Administrator-privileged user or Administrator in the Administrator Name field. The Gateway uses this account to log onto the Enterprise.
The Incoming_Outgoing Faxes settings allow you to configure inbound and outbound fax options.
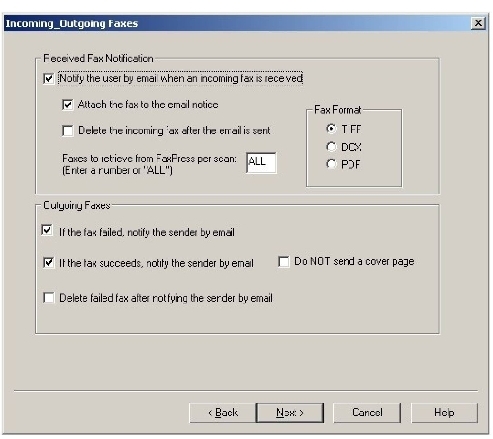
In the Received Fax Notification section, if you select Notify the user by email when an incoming fax is received, you can choose to Attach the fax to the email notice, and then select the format (TIFF, DCX, PDF) for the attached fax from the radio buttons on the right. TIFF is the default; PDF is an image file only and is not searchable.
You can also choose to Delete the incoming fax . . . after the notice and attached fax are emailed. Finally, if the Xerox system is unable to handle the number of faxes being received by the FaxPress Enterprise, use the Faxes to retrieve from FaxPress per scan: option to limit the number of faxes retrieved during each scan period. In most cases, the default ALL setting is adequate .
In the Outgoing Faxes section, you’ll typically want notifications to be sent for both successful and failed faxes (check the If the fax failed, notify the sender by email and If the fax succeeds, notify the sender by emailoptions.) In most cases, you’ll also want to leave the Delete failed fax. . . and the Do NOT send a cover page options unchecked. For fax broadcasting, or in other kinds of high volume faxing situations, however, you may want to use the FaxPress Enterprise’s Imprint Header option instead of a fax cover page. See the Using the Imprint Header chapter in the FaxPress Enterprise Administrator Guide for more information.
The Email to Fax settings allow you to specify your SMTP mail server information. This window will not appear if you selected the MAPI option rather than SMTP.
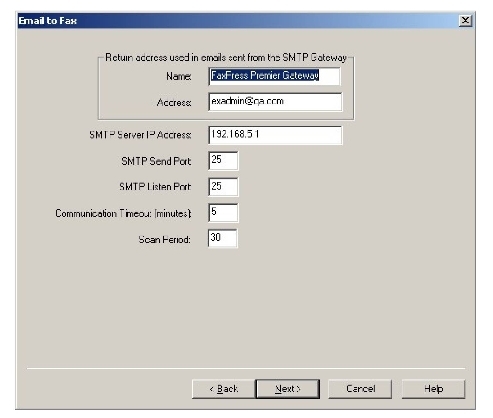
The FaxPress Enterprise Xerox Interface requires your mail server’s IP address to deliver email notifications. Leave the default settings for the Address of the interface, the SMTP port, the timeout, and the scan period, unless changes are required by special circumstances, and Castelle technical support asks you to make the changes.
The User Map requires you to set up mapping between email addresses and the FaxPress Enterprise users already assigned to the fax repositories. Mapping email addresses to FaxPress Enterprise users provides fax and email integration, both fax-enabling the specified email addresses and allowing the Xerox Interface to retrieve faxes from the fax repository. Each default Fax Repository user must be mapped to an email address.
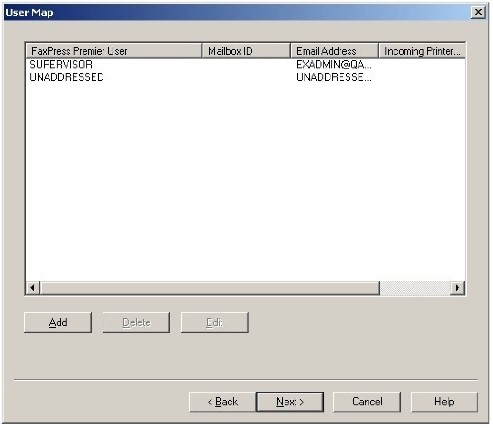
Use the Add button to map a FaxPress Enterprise User to an Email Address.
The Enter a FaxPress User to Email Address Mapping window allows you to associate a FaxPress Enterprise User with a corresponding Email Address and Mailbox ID, then specify the printing action to take for both outbound and inbound faxes.
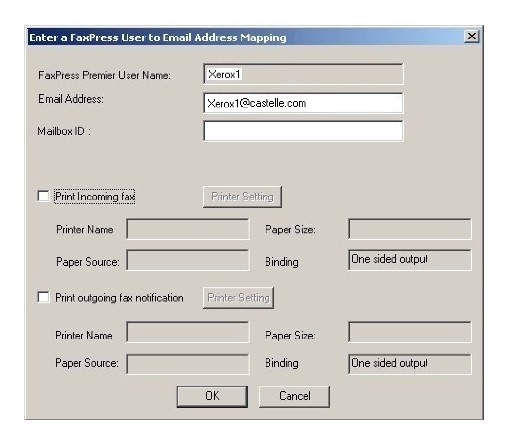
After mapping the user, you can enter their Email Address if you want them to get email notifications of received and outgoing fax events. Leave the Email Address field blank if you do not want them to receive email notifications.
Enter an optional mapping for any user who wants to use their mailbox ID to authenticate themselves when they are sending faxes from a Xerox WorkCentre Pro; if they are mapped as Xerox and FaxPress users, they can enter their mailbox ID, then the fax number of their recipient, and be authenticated to send the fax.
To set up the user for receiving print-outs of incoming faxes, check the Print Incoming fax checkbox, then click the Printer Setting button.
In the Printer dialog box, select the printer from the pull-down menu; typically, you will choose the Xerox system, as in the figure below.
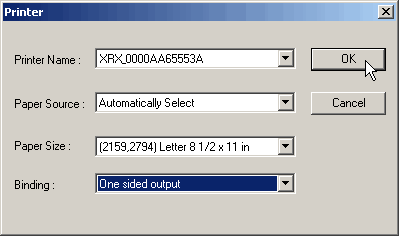
Select the Paper Source, Paper Size, and Binding settings that are the defaults for the printer, then click OK. The FaxPress User Mapping dialog box reappears, with the printer settings displayed.
Repeat this process to Print outgoing fax notification for the mapped user. Check the checkbox, click the Printer Setting button, and use the Printer dialog box to make the printer settings, then click OK. The FaxPress User Mapping dialog box reappears, with the printer settings displayed.
Click OK in the FaxPress User Mapping dialog box when you have completed all mapping and printer settings for the user. The User Map tab reappears, with the user added to the list. Repeat this process for each user you wish to map.
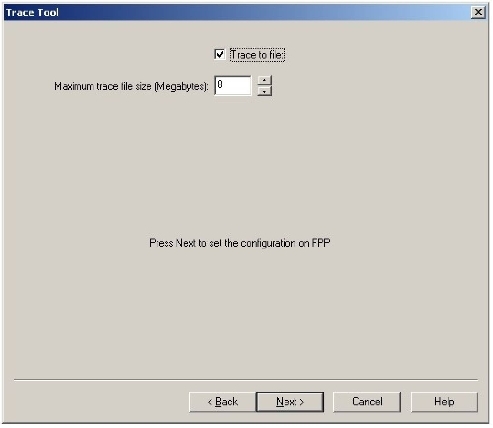
The Trace Tool is a troubleshooting tool that allows you to either enable or disable the trace file, and specify a maximum files size so the trace file does not grow too large and compromise Enterprise performance. The trace file is located in C:\Documents and Settings\User\My Document\Xerox Interface\XGTrace.txt.
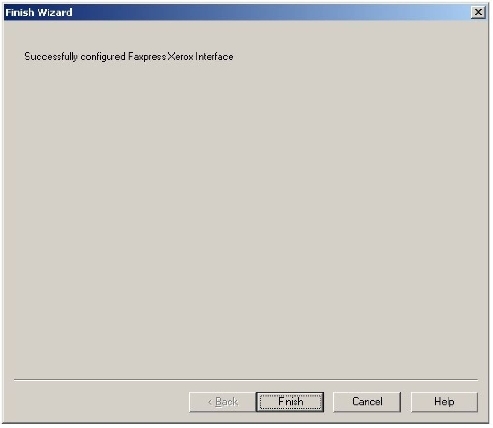
In the Finish Wizard window, click Finish or use the Cancel button to exit the setup and revise the configuration settings.
|
FaxPress Enterprise & Enterprise Redundant WebHelp
Last Updated: 11/1/2007
E-mail this page |
Castelle 855 Jarvis Drive, Suite 100 Morgan Hill, CA 95037 Toll-free 800.289.7555 Tel 408.852.8000 Fax 408.852.8100 |